Table of contents
- What is a blogger?
- Why use Blogger?
- How to login to Blogger
- How to create a new blog
- Customize dashboard contacts and theme uploads
- Required page / favicon / logo upload
- How to add top-level domains
- Blogger Settings / A to Z here
1. What is a blogger?
Blogger is a blogging CMS (platform) from Google. This is a completely free site. This allows you to create a blog. But all your pictures will be hosted by Picasa (Picasa Google's service). In this sense, Blogspot blog can be called Google-centric. Blogger or Blogspot is the same website. If you create a blog here, it will give you a subdomain like (blogname.blogspot.com). You can manage your blog using it. You can even create a website of your choice by adding a TopLaben domain by spending a little money here. It's easier than WordPress, Joomla, PHT, etc. CMA's. With a little bit of HTML knowledge, you can create a visually pleasing website.
2. Why use Blogger?
When it comes to finding the answer to this question, the first thing that comes to mind is the free platform. You don't have to buy hosting here. Hosting Renew, Brandwidth has no problem. Even if millions of visitors enter your site at once, the site will not showdown. Again very safe in terms of security. If it is a self-hosted site, you are responsible for the security of the entire site, but if your site is hosted on Blogger, then the security is the responsibility of Google. Understand.
The biggest thing is that it is very easy to manage as there are fewer options in Blogger's dashboard. A user can master it with very little time or effort. Since it is a Google product, you can use it without fear.
Let's get started. We will create a complete website step by step.
3. How to login to Blogger
Blogger is a free blogging platform from Google. Here you can easily create a website. Today I will teach you how to create a professional website. And how to make money from that website. Everything you need to create a web site.
First, you need a Gmail ID See how to open a Gmail ID?
Then click on this link to login to www.blogger.com then the following page will appear.
Lookafert the picture above. You need to log in with your Gmail by clicking on “SIGN IN”.
After logging in, click on the “CREATE YOUR BLOG” part of “2” and then the following page will appear.
4. How to create a new blog
Then don't delay and see how to create a website and make money from it. Follow all the steps below to create a complete blog.
As you can see in the picture above, your blog is created only if you do it carefully from 1 to 4. Now you can see your blog by clicking on the text "View Blog" in the top left. The first part of creating our blog is over, now it's time to register a domain and set up a domain.
First, you need to create a Gmail ID.
Then log in to your Blogger Account with your Gmail ID.
Then you will see the image below.
How to create a free blog with BlogSpot?
Click on the yellow button Create New Blog in the image above.
After clicking on Create New Blog, it will show like the image below.
How to create a free blog with BlogSpot?
Enter the name of your blog in place of the title above.
Enter the address of your blog in place of the address. It must be completely unique. Everyone will find your blog through this address.
Then you can see the pictures in the theme indicated by arrow number 3, these are different designs of BlogSpot Theme. From here you can select any one of your choices.
Then by clicking on the latest Create Blog, your blog will be created automatically.
I think creating a blog with Google BlogSpot is not as easy as creating a blog on any other platform. A blog can be created with just a few clicks through a Gmail ID. For those who are new to the blogging world, they must create a blog with BlogSpot. Now we will discuss all the parts of the blog.
05. Customize dashboard contacts and theme uploads
Introduction to new posts and blog posts
- The image you see above is the Blogger Dashboard's post option. Clicking on the New Post option indicated by the arrow will show the Post Editor part like the image below.
- You can also see for yourself the remaining four parts.
- The top part of the image above is the place to write the Post Title. Here you have to write the title of your blog post.
- Then you can see all the Html and CSS codes of your blog post by clicking on the part that you see as Source Code. If you have no experience with Html and CSS then there is no need to work on this part.
- You can see in this part called Post that I have written what I want to post. Express your thoughts freely here. It looks a lot like MS Word. You can better organize your post by using the menus here. You can understand this part by yourself.
- If you click on the Publish button in the picture above, your post will be published immediately. You must set some things before publishing the post.
- In the second part called Labels, you can give a name to match the subject matter of your post. This will show posts of the same label together.
- You can enter the Url address of the post in Permalink. Everyone will find your post through this link. If you want to know more about this, you can read this post.
- You can write the details of your post very short here as you can see the last 4 inconsistencies. This is also very important for search engine optimization.
- There are also some more parts. But even if you don't do these, there is no problem. This is why I did not discuss them here.
Blogger Dashboard Stats Introduction
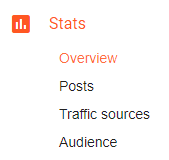
- Stats: Clicking here will show like the image below. This option allows you to know how many followers your blog has, how many pages views it has, where visitors are coming from, and so on.
- Stats: There are 04 more options under Stats. See details below about it-
- Overview: This option is just like the previous Overview. Just get some extra options about Post View and everything else is like the previous one.
- Posts: Click here to see the image below. From here you can know the details about Posts and Page View i.e. how many times a post and page has been viewed. Here on the top right, you will find some options of days, weeks, and months. You can learn more details using these.
- Traffic Source: This simple word means you can understand yourself. From here you can know from which sites visitors are coming to your site. You can also find out more about what kind of keyword visitors are using to enter your site from search engines. See the image below-
- Audience: From here you can find out how many people have visited from which country, what type of browser is visiting your site, and what type of operating system your site is visiting. See below-
Blogger Layout Introduction
- If you click on the Layout option from the Blogger Dashboard, you will see the Blogger Layout as shown below.
- This is the layout part of every blog. However, the Blogger Layout may be a little different depending on the template.
- The part marked with 2 numbers in the image above is the Blogger Gadget button. These shots can usually be on the right, top, bottom, or even left side of the Blogger Layout. Whenever you add a new widget, you have to click on this button. After clicking this button you will see the image below.
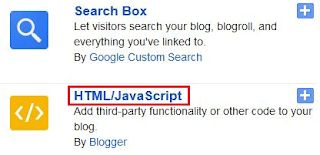
- One of the options you can see in the image above is Gadgets. You can add them to your blog by clicking on them. Clicking on any one of these will bring up another box, clicking on Save will add the gadget to your blog.
- The image you see above is also a Blogger Gadget. The reason it stands out is that it is the most widely used of the Blogger Gadgets. If you want to add a custom widget to your blog, you can do so.
Blogger Theme Introduction
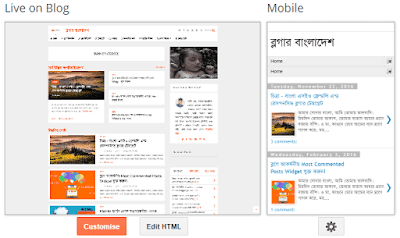
- Blogger Dashboard Theme from the Preview option and click on the blog, you will see the following image. Preview to see the two being a computer and one for mobiles.
- Here you can see the two options under Live on Blog (Customize & Edit HTML) using the two options you can customize your Theme as desired.
- If you click on the Edit HTML button, you will see all the web code of your template as shown below.
- This is the coding section of your Blogger template. Here you can customize your theme using Html, CSS, and JavaScript. For this you must have an idea about web design. In a word, you can do whatever you want with your blog here.
- Then there is the Customize option. This allows you to customize your Them without any coding knowledge. However, there are some limits, you can not do anything here beyond this limit. Click on the Customize option to see the image below.
- Under the Customize option you can see 05 more options. Using these you can customize your template.
- The first Theme option highlighted in the image above, on the right side of the Theme of different designs. If you wish, you can use different themes by clicking here.
- From the Background option you can use a variety of Background Colors and Pictures in your theme.
- You can understand the simple meaning of the word Adjust Widths. You can only change the width of your theme from here. There are two options here. Entire Blog allows you to change the width of the main side of your blog and the right sidebar from the right sidebar. You will see a preview of the change below. This will make it easier for you to adjust.
- There are different types of layouts for blogs. For example, there is a two-column, three-column and even four-column layout. You can use it as you wish. You can easily understand this by looking at the layout images.
- There are several more options under the latest Advanced option, which I can't describe now. These allow you to change the different colors, fonts and styles of your theme. You can easily understand when you see these shots. Even then, if anyone doesn't understand or has a problem understanding, you can let us know by commenting. We will try to solve your problem, inshallah.


